What is a card?
A card contains key information regarding activities and their status. They can also be marked according to their priority and assigned to individuals or groups of people for action.
Cards can easily be moved from one list to another using Drag and Drop.
Add a card
To add a card go to the relevant list and click on Add Card, or click on the 3 dots ellipsis in the top right hand corner. Give your card a title and if required, a description. Click OK to save the card to the list.
Top Tip
- You can use VertoSense within the Description field to connect Users, Files, Projects, and Global Files to your card. See What is VertoSense? for more information.
Edit a card
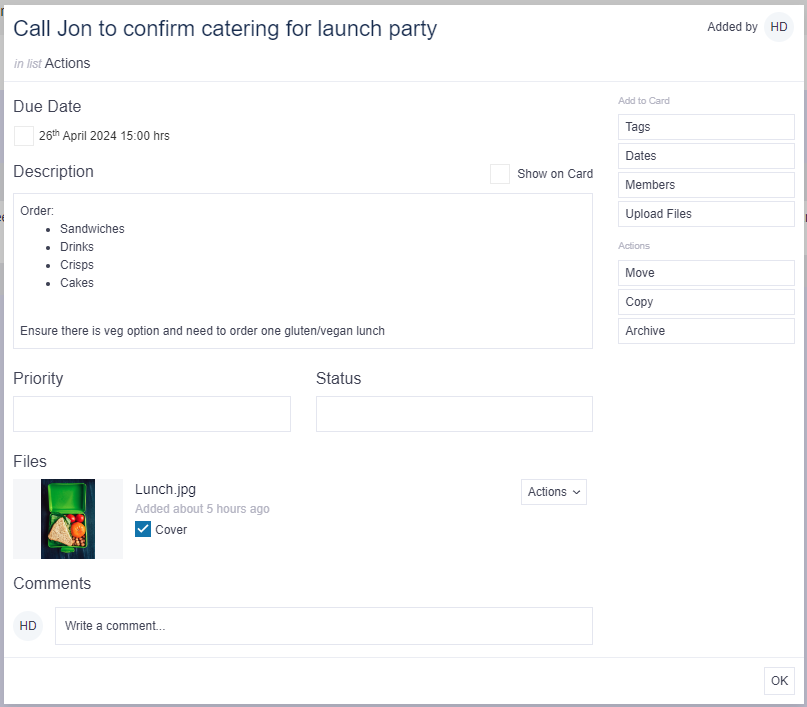
Click on the card you want to edit. The following options will be visible on the right hand-side:
- Tags – to create and add labels which can be used for filtering your cards.
- Dates – to add start and end dates for completion.
- Members – assign people to the card.
- Upload File – to attach a document to the card.
- Move - to move the card between lists within the board or to another board (My Board or project level)
- Copy - to copy the card to another list within the board or to another board (My Board or project level)
- Archive - to archive the card. Note: it is possible to view and unarchive a card if needed.
- Comments - to add a comment directly on to a card.
Add tags
Tags can be added to cards to help you filter your boards based on specific themes.
From the card menu, select Tags. From here you can either create a new tag for your card or select an existing tag. To create a new tag, simply click Create New Tag, add a description and choose a colour. Click Save.
Use the only show tags from this board checkbox to filter out unwanted tags.
Note: as soon as the first tag has been added to the card, you can use the teal + button to add additional tags as well.
Add a date
From the card menu select Dates.
From here you can choose to add just a start date, just a due date or both a start and due date. Note: you do not need to add a start date in order to add a due date and vice versa. If required, a specific time can also be selected along with any preferred reminders. Click Save.
Reminders will be sent to assigned card members via notifications. Cards can be marked as Complete by ticking the grey checkbox against the date(s).
Assign members
From the card menu select Members. Find a person by typing their name or email address and choose from the list. Repeat until all members have been added to the card. Click Close.
If there are any due date reminders set for the card, every assigned member can receive a notification.
Note: card members will see the card they have been assigned to within the Feeds area unless they are a member of the project or the board has been shared with them.
Upload a file
From the card menu select Upload File. Search for the file you want to add and either double click or drag and drop the file onto the card. A pop-up will be displayed showing the uploaded file and a green tick when the process is complete. Click on Close.
Use the Cover checkbox to display your preferred image on the front of the card.

Add a comment
To add a comment, click on Write a comment, a separate free text pop-up will appear. Click Save & Close to add the comment to the card.
Any Members of the card will then receive a notification advising them that a comment has been made.
To edit a comment, click on Edit.
To delete a comment, click on Delete.
Note: editing and deleting can only be done by the Card Member who wrote the comment.
Watch this video to find out more: